Showing posts with label Image Bank. Show all posts

Friday, 9 October 2015

Minimum Depth Of Field - Image Bank

A camera can only focus its lens at a single point, but there will be an area that stretches in front of and behind this focus point that still appears sharp. This zone is known as the depth of field. It’s not a fixed distance, it changes in size and can be described as either ‘shallow’ (where only a narrow zone appears sharp) or deep (where more of the picture appears sharp). A classic example is when you’re photographing a landscape, where generally the most desirable outcome is to capture detail from the fore ground to the horizon. Other times, a shallow depth of field will be preferable. It enables you to blur background and foreground details, causing distractions to melt away and allowing you to direct viewers to the focal point in a picture. There’s a range of ways to control the depth of field – the choice of aperture, focus distance and the type of camera. In a nutshell, wider apertures and closer focusing distances lead to a shallower depth of field.

In this image the background of the composition is blurred. Blurring the subject who is placed in the background. The person in the background is performing a action, being a throw. The in the foreground, the ball is not blurred and is in fact focussed. The positioning off the ball matches the pose of the subject, therefore illustrating one particular movement/action. Even the way in which the subject is leaning to the right of the composition, where the ball is, implies movement. A sense of depth is furthered through the size of the ball in comparison to the subjects head. The ball is similar size to his head which it isn't normally in reality, therefore implying distance between the ball and the subject as the ball seems bigger in size.

The background of this image is completely blurred in contrast to the subject in the foreground of the composition. The subject is placed to the right of the composition, looking towards the left. The subject remains the focal point despite being placed to the right of the frame. The contrast between the blur and focus enhances the tones and colour of the subject, intensifying their from and shape. Also the reflection in the mans glasses is very effective due to it being in focus.

Narrow depth of field is used in this photograph very effectively, the camera is focussed on the blue pencil. All the rest of the composition contrasts to this as both the foreground and background is blurred. This therefore allows the blue pencil to stand out from the others. Also there is a horizontal strip just below the centre of the composition which the pencil debris on the surface is in focus.


The two images above imply depth of field very similarly. The blurring that takes place in both cases enhances the detail of the objects in the foreground but also forms new shapes in the background. Where the background is blurred in both cases, circles are produced where light is present and exaggerated. In the first image the coloured lights are blurred in the background and also in the foreground and focusses on the second light. Due to this as the lights get further away, the more the shape of the light is enhanced and exaggerated. In this second photograph the plants in focus acts as a silhouette effect and intensifies the detail and shape of the plant.


In this piece a close up of a flower is created using a narrow depth of field approach. Despite this being a closeup, the edges of the petals are blurred, in contrast with the centre of the flower which is placed in the centre of the composition which is in focus. Also slightly towards the left of the composition is a bee is feeding off the flower. The fact that the majority of the composite  is blurred and the centre isn't, produces the focal point here and makes the viewers first notice the bee feeding off the flower. Also the background of the piece is seemingly dark in comparison to the much brighter colour centre area. Therefore contributing to the fact that this is the focal point as there are many reasons to why it stands out.


Wednesday, 30 September 2015

Double Exposure Image Bank

A multiple exposure is the superimposition of two or more exposures to create a single 
image, and double exposure has a corresponding meaning in 
respect of two images.

In this photograph, alike a lot of Christoffer's work a plain background is used to enhance the attention and detail to the figure in the centre of the composition. A close up image is used from a slightly low camera angle. This image has been merged with a photograph of a forest where trees and bushes are visible. The forest is composed of various lines and shapes which are enhanced by the black and white effect used. Despite the merging of the two photographs the left eye, nose and a part of the mouth can be seen through lighter tones. The overall outline of the piece is in the shape of the human, filled with forest detail. It could be considered that this double exposure provides a sense on adventure that perhaps the subject has been on through the forest.


This pieces of photography uses a slightly different approach as this time the leaves/trees are the dominant figure with a man's face blended into the centre of the composition. Patterns of leaves are used to show the hair and eyebrows of the figure. Darker tones are used to show the form and detail of the man's face. This time a plain light background is not used, as the leaves continue and fill up the whole composition. The areas surrounding the face are much darker and therefore highlights the face, making it more bold and it therefore stands out in the detailed surroundings. Perhaps the fact that the subject blends in with the background portrays a disguise or front that the subject might be putting up. It even could be interpreted that he is not noticed or unique and just blends in with everything.


These two multiple exposure pieces are very unique as instead of using a human as the subject, here animals are being used to blend with a second image. I feel that these are very successful as the photo of the animal and the landscape work well together and compliment each other. I feel that this use of the two images has a purpose of showing the animals and the habitat/environment it lives in They both include a forest image including conifers which complement and resemble the texture of the animals fur. Also a sense of depth is shown through the trees getting smaller towards the top of the composition, they also are much lighter in tone and seem mighty/foggy which imply distance. These two images are very effective in showing the different ways the composition can be filled. The first image shows the whole body of the wolf whereas the second photo shows the wolf's head from a side-on angle.

With this piece of double exposure photography the outline of a humans head/shoulders/side profile is used and another photograph of a pile of cigarettes fills the outline. The dark tones of the ends of the cigarettes illustrate that they have been used and perhaps could suggest that the subject is the one who has smoked them. It could imply a sense of addiction in which the subject could have and the number of cigarettes seen can imply the depth of the addiction. The fact that the background is light allows the shape/outline of the subjects profile to be enhanced.


Thursday, 17 September 2015

High Key Lighting - Image Bank

In the following images the technique of high key lighting is used, this is a style of lighting for film, television, or photography that aims to reduce the lighting ratio present in the scene. High Key lighting reduces the contrast of light, minimising shadows and enlightening the whole image, with a range of light tones and whites and not very many blacks or mid-tones. High key lighting is often used in fashion and portraiture with light backgrounds and is often associated with a feminine  or youthful approach.
These two images both are organised in a portrait orientation, capturing the model from around the shoulders upwards. Due to the high key lighting technique both of their backgrounds are white, which allows the subjects to stand out. In both cases minimal shadows can be seen, in the left image there are some shadows on her fingers/hand and on the right image there are some shadows on her cheeks and neck. The rest on the subjects skin are very light, in the right image this has been enhance by the makeup, ensuring that she herself is white. Due to the skin and most of the image being so pale and light, this allows the coloured parts of the image to be intensified and exaggerated. In both cases makeup is used to introduce colour and also the colour of the eyes are enhanced. 


These two photographs provide a very feminine feel, both models are standing slightly side on with there head turned and looking directly at the camera with an intense facial expression. In the portrait composition it seems as they are not wearing a top so the collar bones and frame of their bodies can be seen through the slight shadow and highlights. Once again makeup is applied to add colour but in these cases it is applied on a much smaller scale. Small amounts of eye shadow and mascara have been used to ensure that the eyes stand out. Both backgrounds are light but the right images background is slightly off white, to compliment the colour of the subjects skin. In the left image a prop has been used to introduce a sense of colour, an accessory made out of flowers is being worn, which also contributes to the sense of femininity and beauty.


These two images are slightly different to the rest of the images as they are both in landscape orientation. They are both front on to the camera and fill up the composition similarly. The subject has been captures from shoulders upwards and also cutting of the top of their heads. In these cases, high key lighting is used in oder to amplify the subjects' youth. White backgrounds are used and also the only strong shadows are on the neck and mouth due to their positions and facial expressions. In the second photograph, the colour of the eyes are enhanced due to the paleness of the rest of the composition


Slow Sync - Image Bank

Slow sync is a feature available on a wide range of digital cameras that enables you to fire the flash at lower shutter speeds. It permits you to keep shooting in a variety of low-light situations, thereby opening up new possibilities. By using slow sync flash, you can get a properly illuminated subject/foreground, yet still have the low ambient light in the foreground and background register in your frame. Many digital cameras let you set slow sync flash manually, but even on point and shoot cameras you have the ability to shoot at slow sync. In order to shoot slow sync photography, you need to preferably have a dark background and a  soft box to be able to see the object. The modelling light in the soft box records the blurred movements of the subjects and the flash freezes the image, capturing the still sharp image.
This photograph demonstrates the slow sync technique but not in regards to shooting in a studio. Instead this is a black and white photograph of a waterfall. Due to the slow sync the water seems almost smooth in texture and misty as it falls off the rocks in various lines. However there still is a sense of a dark background through the rock face which is virtually black and allows the form and shape of the water to be enhanced. This great contrast gives a similar effect as to the one applied in the studio. The is a sense of depth  through the way the water bends and how the rocks get smaller towards the right of the composition.


The two images above are very similar as they both present the same subject matter of dancing. They both have black backgrounds which amplifies the shape and form of the subjects. These backgrounds are very effective in showing the blurred/smudged streaks and lines which represent the movement of the subjects. Within the blurred areas, various shapes can be seen which show the different stages of the subjects body movement. The contrast between the shadow and highlight areas are very effective in showing the form of the dancers' bodies. Also the arms and legs are very straight and direct which give a sense of lines. However there is a slight difference in the compositions of the two images as the first one is portrait and seemingly closer than the second image. This work effectively as is work accordingly with the dance move due to the subject jumping. This differs to the second photograph as it is landscape and more zoomed out which allows the dancers forwards/sidewards movement as the blurred lines streak to the left of the sharp frozen image.

This is another photograph which was shot in the studio with a black background but instead of showing the movement of a human or an object, it shows the movement of an animal and in this case a bird. There is a frozen image in the centre of the composition consisting of the main body of the bird and the fact that the bird is white allows it to stand out and allows for the movement to me seen evidently. There are arching lines which begin at the bottom of the birds body and end towards the top of the frame. This gives the impression of the bird's wings moving in order to fly. Along with the positioning of the birds head and the blurred section underneath the bird, the overall feel is that the bird is ascending. 

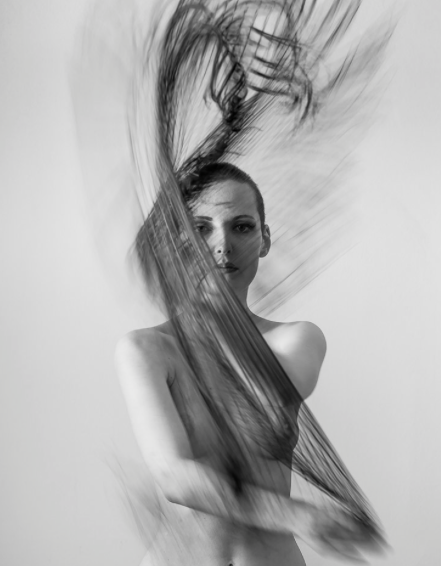
In this image a different approach has been made. Instead of using a dark background, a white background has been used. Usually with slow syncs a dark background is used with a light subject so there is a clear contrast which allows the movement to be seen. This picture acts as a invert to this method as there is still a contrast present which allows the movement to be seen but just in the opposite way. Here the frozen image is a woman which is looking directly at the camera whilst seeming to be waving an object about. The dark object causes dark lines to be made to make it apparent what direction it is travelling and also provides a sense of shape and from. There are thinner/smaller lighter lines which appear to be further away and provide a sense of depth.


Thursday, 18 June 2015

Multiple flash Image bank

A camera that implements multiple flashes can be used to find depth edges or create stylized images. Successive flashing of strategically placed flash mechanisms results in shadows along the depths of the scene. This information can be manipulated to suppress or enhance details or capture the intricate geometric features of a scene (even those hidden from the eye), to create a non-photorealistic image form.


Here the movement and projection of the ball is shown through the many different balls in the picture which convey the bounces of the ball. This also gives the sense of lines which are in the shapes of arcs which get smaller towards the right. Therefore showing the movement of the ball.


In this photo the different stages of the golfers swing is shown which is made clear through the many different straight lines, showing the shaft of the golf club. The lines and shapes in the picture are enhanced by the dark surroundings. Also the ball appears 5 times which projects its movement as they are all heading towards the same direction. The last ball is streaked which gives the impression of movement.


This picture contains eight different images within it. The different pictures illustrate the different stages of the dancers movement as the body is poses in eight different positions. The shape and structure of the body is enhanced through the use of the dark background. Each picture overlaps each other and seems like the opacity levels have been altered.


Thursday, 11 June 2015

Sequencing - Image Bank

The first 3 photographs are examples of sequencing where several different images have been merged together to create a new piece. They are very effective in showing the movement and progression of the subject. In order to create these, several photographs are placed over the original and the areas that are not needed are rubbed out.

Here 5 different photographs have been taken in the exact same position to show the movement and direction the plane is travelling in. They are all placed in the centre of the composition and get bigger as they get closer to the top of the frame, implying a sense of depth.


In this case seven different photographs have been taken and merged together to create a new image. The different pictures show the stages of the snowboarders jump due to the poses the subject makes and the position in the composition. Where the subject is highest in the composition is the peak of the jump and the lowest position  is where he lands.


In the last 3 images a different sequencing technique is used. This time the several different photographs are kept separate and can be organised in various ways, however it still shows the movement and progression of the subject.

Here the photographs are organised using the multiple imagery technique in a collage style. The order of the pictures can be recognised through the poses and positions on the subjects in the composition. The order starts from the top row, followed by the bottom row all moving left to right.

In these photograph the progression of the subjects throw is illustrated in three different stages and therefore is organised in the style of a triptych. All three images are in a portrait layout and all have a black and white filter. The different positions of the subjects arm and the ball make the movement clear.