Thursday 18 June 2015

Multiple flash Image bank

A camera that implements multiple flashes can be used to find depth edges or create stylized images. Successive flashing of strategically placed flash mechanisms results in shadows along the depths of the scene. This information can be manipulated to suppress or enhance details or capture the intricate geometric features of a scene (even those hidden from the eye), to create a non-photorealistic image form.


Here the movement and projection of the ball is shown through the many different balls in the picture which convey the bounces of the ball. This also gives the sense of lines which are in the shapes of arcs which get smaller towards the right. Therefore showing the movement of the ball.


In this photo the different stages of the golfers swing is shown which is made clear through the many different straight lines, showing the shaft of the golf club. The lines and shapes in the picture are enhanced by the dark surroundings. Also the ball appears 5 times which projects its movement as they are all heading towards the same direction. The last ball is streaked which gives the impression of movement.


This picture contains eight different images within it. The different pictures illustrate the different stages of the dancers movement as the body is poses in eight different positions. The shape and structure of the body is enhanced through the use of the dark background. Each picture overlaps each other and seems like the opacity levels have been altered.


Close ups - Work Diary

In this shoot I focussed on creating close ups of objects where I used the macro setting on my camera and took pictures at its maximum zoom. When doing this I tended to focus on specific parts of the subject and in doing so this area being very detailed. In most pictures the background would be blurred which enhances the detail of the focal point.
Here I attempted to produced a silhouette type of effect where the objects in the foreground are much darker and defined than objects in the middle and background. Here the contrast of light and colour enhances the detail of the leaves and branches in the foreground. The background lighter and blurred in comparison to the foreground. I feel like this image is very effective however, perhaps I could of zoomed in more to the subject in order to form a photograph which reinforces the close up theme.
In this close up image I chose for the subject to be a plant. Using my camera's maximum zoom as well as the macro mode I was able to produce a very detailed image of a small section of the flower. The camera is focussed on the middle of the flower whereas the rest is blurred which enhances the detail of this point. Also the centre of the flower is much more vibrant and colours which contributes to the fact that this area is the focal point.This effect is continued  through the background being much darker. The contrasts between lighter and darker tones show the shape and form of the flowers petals.

Close ups


Contact Sheets - Close ups


Contact Sheet - Focal Length exercises


Contact sheet - Sequencing


Contact sheet - Picture within a picture


Essay

3000 word essay

This is an illustrated essay of three thousand (3000) words (approximately 6 A4 sides) based on the theme you have chosen (use self assigned project theme). It should be written in an academic style, with references and quotes (saying where you have got them from) and a bibliography.

Your essay could follow the following structure

1. Introduction

Why is it important to study your topic, how prevalent is it in society, why is it important to study in general.
Do not write this in the first person, e.g. do not write 'I have chosen this because…' 

2. Brief History

This is an overview of the history of your topic, don’t write biographies but mention the big names. Include some pictures especially important to include some early ones. It would be good if you could explain the picture by referring to the technical developments in photography, e.g. at the start of photography exposure times were very long so action pictures were impossible, for example war pictures had to be effectively still lives and considered of posed groups or the battlefield after the battle.

3. Two current photographers

Do not write biographies but have a look at the styles of a couple of photographers. Include two samples of their work and analyse them but try to do it so you say things, for example, like ' the picture clearly shows the comparison between rich and poor in such a way that the viewer would be forced to consider the moral implications of money.' 

4. How does your work fit in to this

Include a couple of samples of work you have already shot and discuss them. Here you are allowed to write in the first person.

5. The future

Bearing in mind the technological development how to you see this aspect of photography developing in the future.

6. Conclusion

Just wrap it up summarising the main points that you have made.

Bibliography of all sources used

Overall Checklist

Illustrated Project Proposal - ....
Mindmap - ....
Definitions -....
Personal Project Image Bank - .......

Research Log - completed with at least TWENTY
   No1 why picked..... 4 photos… evaluations… influence... sum....
   No2 why picked…. 4 photos… evaluations…influence....sum…
   No3 why picked… 4 photos… evaluations… influence....sum…
   No4 why picked… 4 photos… evaluations…influence....sum…
   No5 why picked… 4 photos… evaluations… influence....sum…

3000 word Essay - complete introduction... History..... 2 current practitioners..... Your work.......... future........ conclusion......... bibliography...

Connecting your work to others -one... two...t hree.. .four...five...

Contacts personal- one...two...three....four....five....six.....seven... eight...... nine.... ten....  eleven.... twelve .......

Techniques Image Banks Sequencing...........  Animation........ Multiple Imagery ...... Blurring........ Slow Sync......... Multiple Flash..............   Multiple Exposure............. Minimum depth of field.... Location Portraiture……..

Technique Pages - Sequencing...........  Animation........ Multiple Imagery ...... Blurring........ Slow Sync......... Multiple Flash..............  Video......... Multiple Exposure............. Minimum depth of field.... Location Portraiture……..

Techniques - Sequencing...........  Animation........ Multiple Imagery ...... Blurring........ Slow Sync.........  Multiple Flash..............  Video......... Multiple Exposure............. Minimum depth of field.... Close-up..... Wide Angle....... Location Portraiture……..

Work diaries -  Sequencing… Animation… Multiple Imagery … Blurring… Slow Sync… Multiple Flash…   Video…. Multiple Exposure… Minimum depth of field....  Fine Art… Personal project…  Personal project …  Personal project … Personal Project… Personal project…  Personal project… Personal project…  Personal project… Personal project … 
Personal Project… Personal project…  Personal project …

Print Techniques - image within image.... image and text........ weaving... duotone....overlay....selective colour....repetition.....montage... framing...... cluster....

Computer Experiments - 1...2...3....4...5....6.....7... 8......9.... 10....

Physical experiments - 1...2...3....4.....5......

Electronic portfolio with your best forty pics 

Electronic Final Pieces 1..2..3..4..5..6..7..8..9..10..11..12..13..14..15..16..17..18..19..20..

Mid-project evaluation………

Mid-project action plan for personal project………...

Overall project evaluation - .........

Monday 15 June 2015

Picture in a Picture - Straight Images


Picture within a picture - Work Diary

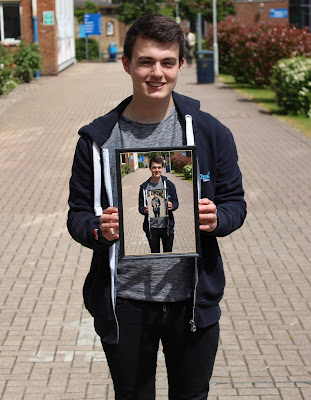
In this shoot I experimented with ways in which I can put a picture within a picture whether it be in photoshop or even while shooting. When brainstorming ideas  and researching other peoples interpetations i decided to experiment with using a phone's camera where subjects can be see on the phone screen and then taking a picture of it. Other ways I tried doing this was taking a photo of a person holding a frame and inserting other pictures inside the frame in photoshop. Overall I felt that the mobile phone technique worked very well and would like to experiment with it more.

To create this photograph I used the phone camera technique. The background of the photo shows two people together however it is very blurred and when the phone is introduced a clear/visible photo of the same people can be seen. Also a minute version can be seen in the bottom left corner of the phones screen. So overall three versions of the same photo is seen and I feel like this is a very effective way to show an image within an image. I also  I feel that a way in which i could improve this
piece would have been to back the background darker, allowing the image in the foreground to stand out more or just make more of a contrast between the foreground and background.


In this attempt to show a picture within a picture I got a person to hold a frame and took a 
photo of him. Then in photoshop I placed the same image over the top and made it much 
smaller , fitting the size of the frame. After this I did the exact same but with the smaller 
image. The resulting effect seems as the subject is holding a picture of himself where he is also holding a picture of himself, therefore showing a specific pattern through the repetition of the same image being placed into each frame.

Picture within a picture - Image Bank


Picture within a picture with an iPhone


Thursday 11 June 2015

Sequencing - Work Diary

I found this shoot really interesting  as I was new to the concept of sequencing, I eventually learnt three different editing techniques in photoshop which were all effective in there own way. My favourite technique was where I had to make it seem as if there were duplicates of people doing different things in the same image. This is because i like the surreal effect it provides. I also enjoyed creating the sequencing animation of a class member jumping up and down. For this I had to take several pictures of the subjects movement (I was able to do this on the continuous shooting mode on my camera) which were then merged together to show the sequence of the subjects movement. I really enjoyed making it however I feel this my subject moves so quick and perhaps next time I would attempt to taking photos of a different movement, maybe a cartwheel or running. Ideally something that is longer than jumping. The last technique which I learnt was were I took five pictures of the same subjects who were performing a movement and place them next to each other to show the progress. This was my least favourite as i feel that the images are too small.

This was my favourite outcome of the shoot. Here I had to take five different images of the subjects at different positions on the bench. I used one of the images as the base image and then placed the other four images on top, erasing all the areas that were already taken up, basically only leaving the figure and shadows of the subject. The end result is where it seems to be the same people appear multiple times in different positions of the photograph but looking real. The only improvements I could think of for this piece would be to perhaps crop or zoom in more so the subject are more visible. Another improvement would have been to include the shadow on the bench from the person sitting to the left side of it, allowing it to look even more realistic.

I feel that this piece was the least effective out of the shoot, here I had to take five different photographs of the same subjects in order to present the progress and different stage of their movement. However as aforementioned I feel as if the images appear too small due to the five pictures being organised in a landscape fashion. So in order to improve this I feel that I could either use less photographs which would therefore allow the individual photos to be larger and more visible.  Or I could even only take photographs of one subject rather than three, once again allowing the photos to be bigger as the width of them wouldn't necessarily need to be as wide. Also I could consider leaving no spaces between the images in attempt to make the progression more evident. 


Sequencing Straight Images


Sequencing Animation

 photo IMG_0814_zpszphe6wmj.gif

Sequencing - Image Bank

The first 3 photographs are examples of sequencing where several different images have been merged together to create a new piece. They are very effective in showing the movement and progression of the subject. In order to create these, several photographs are placed over the original and the areas that are not needed are rubbed out.

Here 5 different photographs have been taken in the exact same position to show the movement and direction the plane is travelling in. They are all placed in the centre of the composition and get bigger as they get closer to the top of the frame, implying a sense of depth.


In this case seven different photographs have been taken and merged together to create a new image. The different pictures show the stages of the snowboarders jump due to the poses the subject makes and the position in the composition. Where the subject is highest in the composition is the peak of the jump and the lowest position  is where he lands.


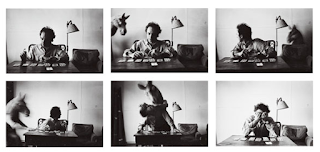
In the last 3 images a different sequencing technique is used. This time the several different photographs are kept separate and can be organised in various ways, however it still shows the movement and progression of the subject.

Here the photographs are organised using the multiple imagery technique in a collage style. The order of the pictures can be recognised through the poses and positions on the subjects in the composition. The order starts from the top row, followed by the bottom row all moving left to right.

In these photograph the progression of the subjects throw is illustrated in three different stages and therefore is organised in the style of a triptych. All three images are in a portrait layout and all have a black and white filter. The different positions of the subjects arm and the ball make the movement clear.